
Image Stacking with Deep Sky Stacker
- Katherine Miller
- Nov 3, 2024
- 6 min read
Updated: Nov 7, 2024
Astrophotography is often a quest for clarity and detail, and in that pursuit, image stacking is an indispensable technique. By capturing multiple images of a target and combining them, we can reduce noise, enhance detail, and bring out colours and contrast otherwise lost in single exposures.
Deep Sky Stacker (DSS) is a powerful, free tool for Windows that helps astrophotographers of all skill levels stack their images efficiently. DSS is particularly adept at handling both deep-sky objects and moving targets like comets, which require additional alignment considerations.
In this guide, we’ll dive into the technical aspects of DSS, explore its various stacking modes, and detail key settings so you can get the most from your deep-sky and comet images.
Benefits of Stacking Images
Astrophotography requires extended exposure times to capture faint celestial objects. However, with long exposures, we introduce more noise and the risk of tracking errors. Image stacking addresses this issue by allowing us to take multiple shorter exposures and combine them, reducing noise and refining details. Each frame contributes data that enhances the final output, leading to crisper, clearer images that showcase the depth and beauty of the cosmos.
Setting Up Deep Sky Stacker
Download and Install DSS
First, download Deep Sky Stacker from their website and follow the installation instructions. DSS works natively on Windows. For Mac users, DSS requires a Windows emulator like Wine or a virtual machine, as it does not natively support macOS.
Organise Your Image Files
DSS works best when you provide four types of frames:
Light frames: The primary photos of your celestial target.
Dark frames: Shots taken with the same exposure settings but with the lens cap on, capturing sensor noise.
Flat frames: Images taken of an evenly lit surface to capture dust or vignetting on the sensor.
Bias frames: Very short exposures that record sensor readout noise.
Group these frames in folders for efficient loading into DSS.
Stacking Deep-Sky Images with DSS
Loading Your Frames

Open DSS, and in the left panel, select the frame type you want to load.
Click Open Picture Files to load your light frames (the main images of your deep-sky object).
Repeat this process for dark, flat, and bias frames. DSS will use these additional frames for noise reduction and calibration.
Registering Stars and Adjusting Detection Threshold

Next, you’ll need to register the stars across all frames to align them accurately:
Select Register Checked Pictures from the top menu. A dialogue box opens with registration options.
Set the Star Detection Threshold. This setting, in percentage, controls how many stars DSS detects in each frame. Start at around 10% for faint objects; you may need a higher threshold (15–20%) for brighter targets. The goal is to balance between capturing enough stars for alignment without introducing unnecessary processing time.
Click Compute the Number of Stars to ensure DSS detects an optimal number of stars (typically between 50 and 200 stars, depending on the target).
Click OK to initiate the registration process. DSS will align each frame based on the detected stars, setting the stage for accurate stacking.
Selecting Stacking Parameters
With registration complete, you’re ready to stack. DSS offers various stacking modes, each suited for different targets and noise reduction goals:
Average Mode: Averages the pixel values across frames. This basic mode reduces noise effectively but retains artefacts. Ideal for smaller stacks or bright objects.
Median Mode: Uses the median pixel value, which is more effective in removing outlier pixels (for example, satellite trails or cosmic rays) but can lower overall brightness. Useful for more consistent, low-noise images.
Kappa-Sigma Clipping: Calculates an average while removing outliers based on statistical deviation. Ideal for removing random noise and artefacts, especially with larger datasets.
Auto Adaptive Weighted Average: Adjusts the weight of each frame based on quality scores, which DSS assigns during registration. Frames with less noise are weighted higher, while noisier frames have reduced influence. This mode works well for larger stacks of deep-sky images, optimising clarity and sharpness.
Select the stacking mode best suited to your target and data quality, and then click OK to initiate the stacking process.
Initial Image Adjustments in DSS
After DSS completes the stacking, a preview of the final image appears. DSS saves an autosave.tif file, which you can fine-tune in DSS before exporting to a photo-editing software. Basic adjustments include:
RGB Levels: Adjust the red, green, and blue channels to balance colour and bring out natural tones.
Luminance and Contrast: Refine the image contrast to highlight celestial details.
Although DSS provides limited editing options, this step can help you prepare for more detailed processing in software like Photoshop or PixInsight.
Stacking Comet Images with DSS
Unlike deep-sky objects, comets move across the sky, complicating alignment. DSS offers a comet stacking mode that lets you stack both the comet and the star field separately. Here’s how to handle this unique challenge.
Load Your Comet Images
Load your comet images as you would for a deep-sky object, ensuring you have ample data for alignment. Comet stacking works best with multiple frames to provide enough positional data for DSS to track the comet’s movement.
Mark the Comet’s Position in Each Frame
For DSS to track the comet, you must mark its position:
Enable Comet Mode. After loading your frames, go to the main DSS window, right-click on each light frame, and select Edit Comet Mode.
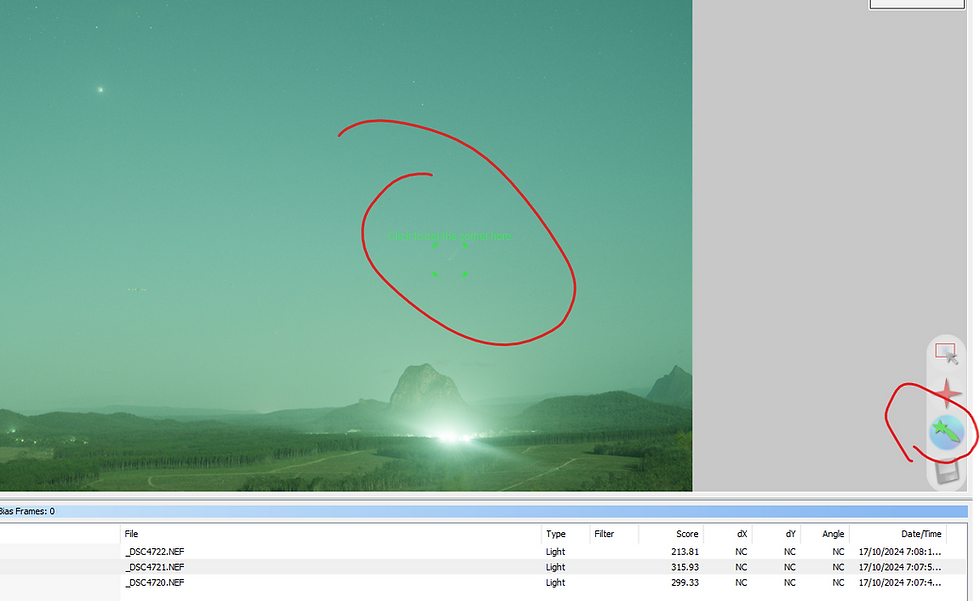
Place a Marker on the Comet. This allows DSS to align the comet’s position across frames, compensating for its movement relative to the star field. Be as precise as possible, as this will affect the final alignment.
If your frames are too dark to see the comet, you can adjust the image brightness using the slider in the top right corner:

Choose a Comet Stacking Mode
DSS offers three comet-specific stacking modes, depending on your goals:
Stars + Comet: Aligns both stars and the comet, keeping both sharp. This mode is ideal for capturing both the comet’s detail and the star field in focus.
Comet Only: Aligns solely on the comet, allowing the stars to blur. This mode is useful when highlighting comet structure is the priority.
Stars Only: Aligns on the stars, letting the comet blur. This mode is rarely used for comets, as it typically prioritises star clarity over comet detail.
Select the stacking mode that best suits your intended outcome, and click OK to begin the stacking.
Post-Stack Adjustments for Comets
After stacking, review the comet image in DSS. Comet images often require additional brightness and contrast adjustments to bring out the details of the nucleus and tail. As with deep-sky objects, exporting your stacked comet image as a TIF file allows you to complete fine adjustments in a dedicated editing program.
Understanding Key DSS Settings and What They Do
Star Detection Threshold: Controls sensitivity in detecting stars for alignment. Lower settings capture more stars, essential for faint objects.
Stacking Mode: Determines how DSS combines frames. Average and Median modes handle noise reduction, while Kappa-Sigma modes eliminate artefacts by removing outlier pixels.
Output Mode: Auto Adaptive Weighted Average is a popular choice for faint objects as it weighs higher-quality frames more heavily.
Alignment Method: DSS supports methods like Bilinear, Bicubic, and Automatic alignment for different star fields. Bi-cubic tends to yield smoother results for fields with dense stars.
Drizzle: Enhances resolution by 2x or 3x, useful for small targets but demanding on processing power. Apply only if you have a high-quality dataset.
Dark, Flat, and Bias Frames: Calibration frames that improve the final image by removing noise (darks), dust/vignetting (flats), and sensor pattern noise (bias).
Final Post-Processing Tips
For best results, follow up your DSS work with professional post-processing. Software like Photoshop, PixInsight, or GIMP can help refine contrast, balance colours, and apply noise reduction. Key steps include:
Adjusting Levels and Curves: Enhances the brightness and contrast for finer detail.
Colour Balancing: Corrects any greenish or reddish hues common in DSS images.
Sharpening and Noise Reduction: Refines the image to enhance structural details without introducing grain.
Mastering Deep Sky Stacker enables you to transform individual frames into polished celestial images. DSS’s various stacking modes and settings cater to both stationary objects and moving targets like comets, making it an indispensable tool for astrophotographers. With practice, you’ll be able to capture deep-sky objects and comets in remarkable detail, transforming your images into captivating portraits of the cosmos.
Comments